
Brand Protection
What Brand Protection covers
Section titled “What Brand Protection covers”Brand Protection finds things outside your network that are built to look like yours or that misuse your brand: lookalike domains, phishing sites, copies of your logo, impersonating social media accounts, rogue mobile apps, fake job postings, and scam reports. Each detection is listed in a grid where your team reviews it and decides what to do, up to asking StyxView to have it taken down.
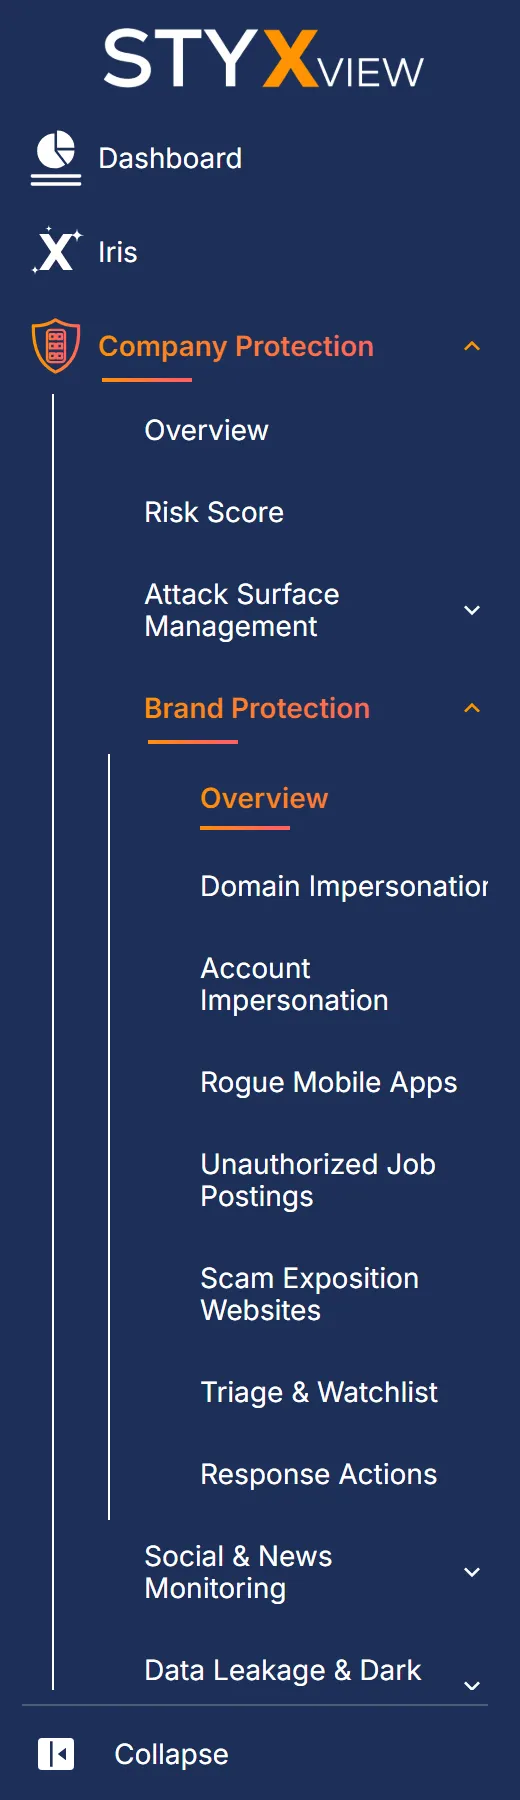
To open it, select "Company Protection" in the left menu, then "Brand Protection".
| Menu item and tab | What it lists |
|---|---|
| "Overview" | Counts and charts across the module. See Overview. |
| "Domain Impersonation" > "Lookalike Domains" | Registered domains built to be mistaken for yours. See Lookalike Domains. |
| "Domain Impersonation" > "Phishing & Evil-Twin Websites" | Websites that copy your portals or services. See Phishing & Evil-Twin Websites. |
| "Domain Impersonation" > "Logo Match Detection" | Web pages that show your logo. See Logo Match Detection. |
| "Domain Impersonation" > "Web Referral Monitoring" | Websites sending visitors to yours, from your web server logs. See Web Referral Monitoring. |
| "Domain Impersonation" > "Web Beacon Monitoring" | Sites serving copies of your pages, from a tracking pixel. See Web Beacon Monitoring. |
| "Account Impersonation" > "Impersonating Social Media Accounts" | Social media accounts posing as your organization. See Impersonating Social Media Accounts. |
| "Account Impersonation" > "Potential Employee Profiles" | Personal LinkedIn profiles to check against your staff. See Potential Employee Profiles. |
| "Rogue Mobile Apps" | Apps that use your name or brand outside your official listings. See Rogue Mobile Apps. |
| "Unauthorized Job Postings" | Job postings that use your organization's name. See Unauthorized Job Postings. |
| "Scam Exposition Websites" | Web pages that report scams involving your brand. See Scam Exposition Websites. |
| "Triage & Watchlist" | Every finding you have added to the watchlist. See Triage & Watchlist. |
| "Response Actions" | Takedowns and suspensions requested for your findings. See Response Actions. |
Working with brand findings
Section titled “Working with brand findings”Most grids in the module work the same way.
- Default filters. Grids that track findings open filtered to the open statuses ("New", "Analyzing", "On Watchlist", "Response In Progress", and "Reappeared") and hide false positives. Remove those filters under "Filters" to see everything. The toolbar is described in Action & Filter Bar.
- Row marks. Small marks beside a row's first value show its state: "Marked as False Positive", "Brand Infringement Detected", "Takedown Requested", "Monitored in Watchlist", and "Marked as Legitimate". Hover over the info icon "What the row marks mean" in the toolbar for the key.
- Detail page. Select a row to open the finding's detail page, with its evidence, status, and comments. See Findings.
- Context menu. Right-click a row for "Open Link in New Tab", "Copy row", and the same actions as the "Actions" button.
Finding statuses
Section titled “Finding statuses”| Status | Meaning |
|---|---|
| "New" | Detected and not yet reviewed. |
| "Analyzing" | Under review by your team. |
| "On Watchlist" | Kept under observation without action yet. |
| "Response In Progress" | A response is underway. |
| "Resolved" | The issue has been dealt with. |
| "Closed Without Action" | Closed with no further action. Marking a finding as a false positive or as legitimate sets this status. |
| "No Longer Seen" | Not present on recent scans. StyxView keeps the record. |
| "Reappeared" | A closed finding was detected again. It deserves more attention than a new one. |
Acting on findings
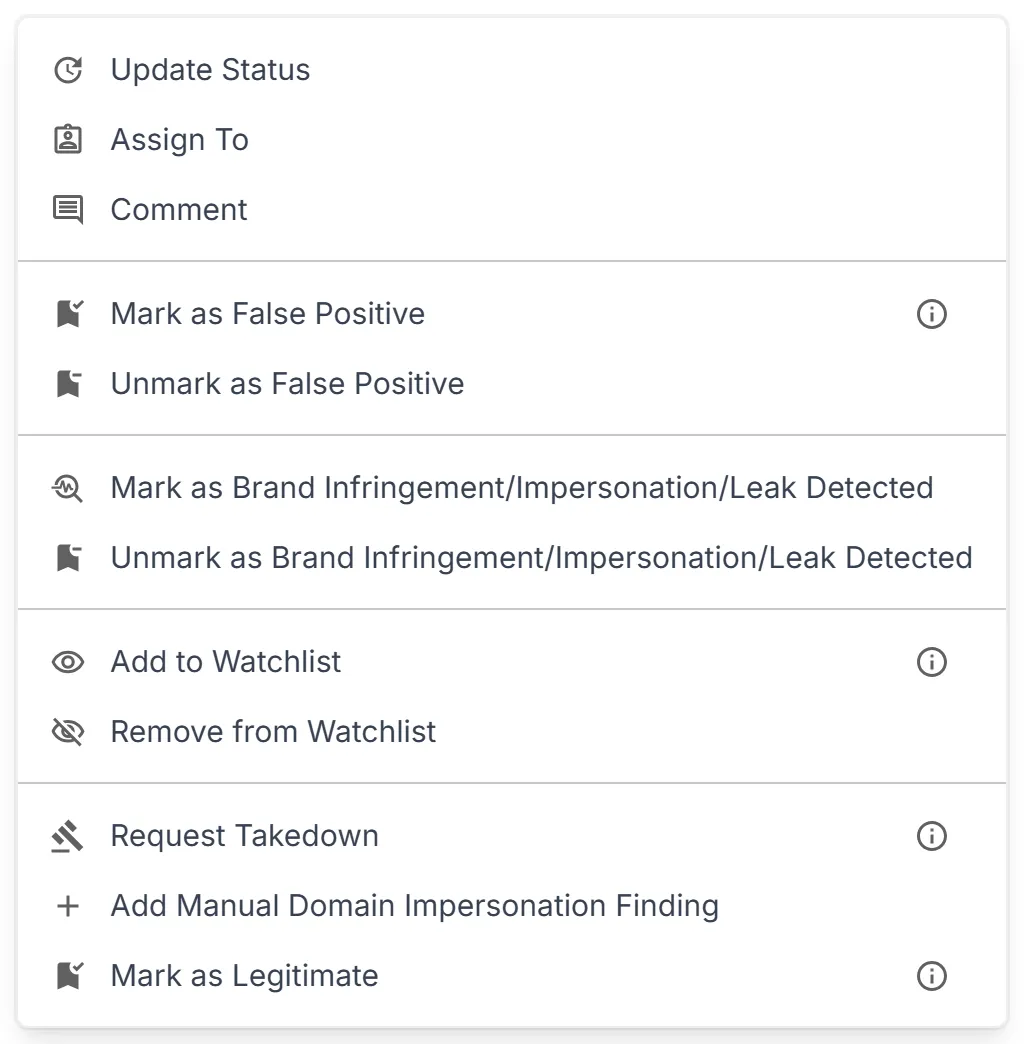
Section titled “Acting on findings”Select one or more rows, then select "Actions", or right-click the selection. Each grid offers only the actions that apply to it; the module pages list them. Most actions open a dialog that asks you to "Add context (required)", and the note is saved as a comment on the finding.
| Action | What it does |
|---|---|
| "Update Status" | Sets the status you choose in "Change Status to:". |
| "Assign To" | Assigns the findings to a user. Assignment sends no notification and does not change the status. |
| "Comment" | Adds a comment to the findings. |
| "Mark as False Positive" | Records that the finding is not a real issue. The status becomes "Closed Without Action", the finding leaves the watchlist, and the grid hides it by default. Detection may still find the same subject again. |
| "Unmark as False Positive" | Reopens the finding with the status "Reappeared" and adds it to the watchlist. |
| "Mark as Brand Infringement/Impersonation/Leak Detected" | Confirms that the finding misuses your brand. "Infringement Detected" shows "Yes". "Unmark as Brand Infringement/Impersonation/Leak Detected" sets it back to "No". |
| "Add to Watchlist" | Keeps the finding under observation without action yet. It appears in Triage & Watchlist. Detection is not affected. "Remove from Watchlist" takes it off. |
| "Request Takedown" | Asks the StyxView takedown team to have the content removed. See Requesting a takedown. |
| "Mark as Legitimate" | Records that the asset belongs to your organization. See below. |
Mark as Legitimate is for assets your organization owns and manages, such as a domain you registered or an official account that detection flagged. The dialog asks you to confirm that the selected assets are owned and managed by your organization. Marking a finding as legitimate:
- sets its status to "Closed Without Action" and takes it off the watchlist;
- from the "Lookalike Domains" grid or a lookalike domain's detail page, adds the domain to your owned domains in Attack Surface Management;
- from the "Impersonating Social Media Accounts" grid or an account's detail page, adds the account to your monitored social media accounts in Attack Surface Management.
Marking from Triage & Watchlist or the Findings page changes only the status and the watchlist. The "Actions" menu has no action to reverse it.
Requesting a takedown
Section titled “Requesting a takedown”-
Select one finding. A takedown is requested for one finding at a time.
-
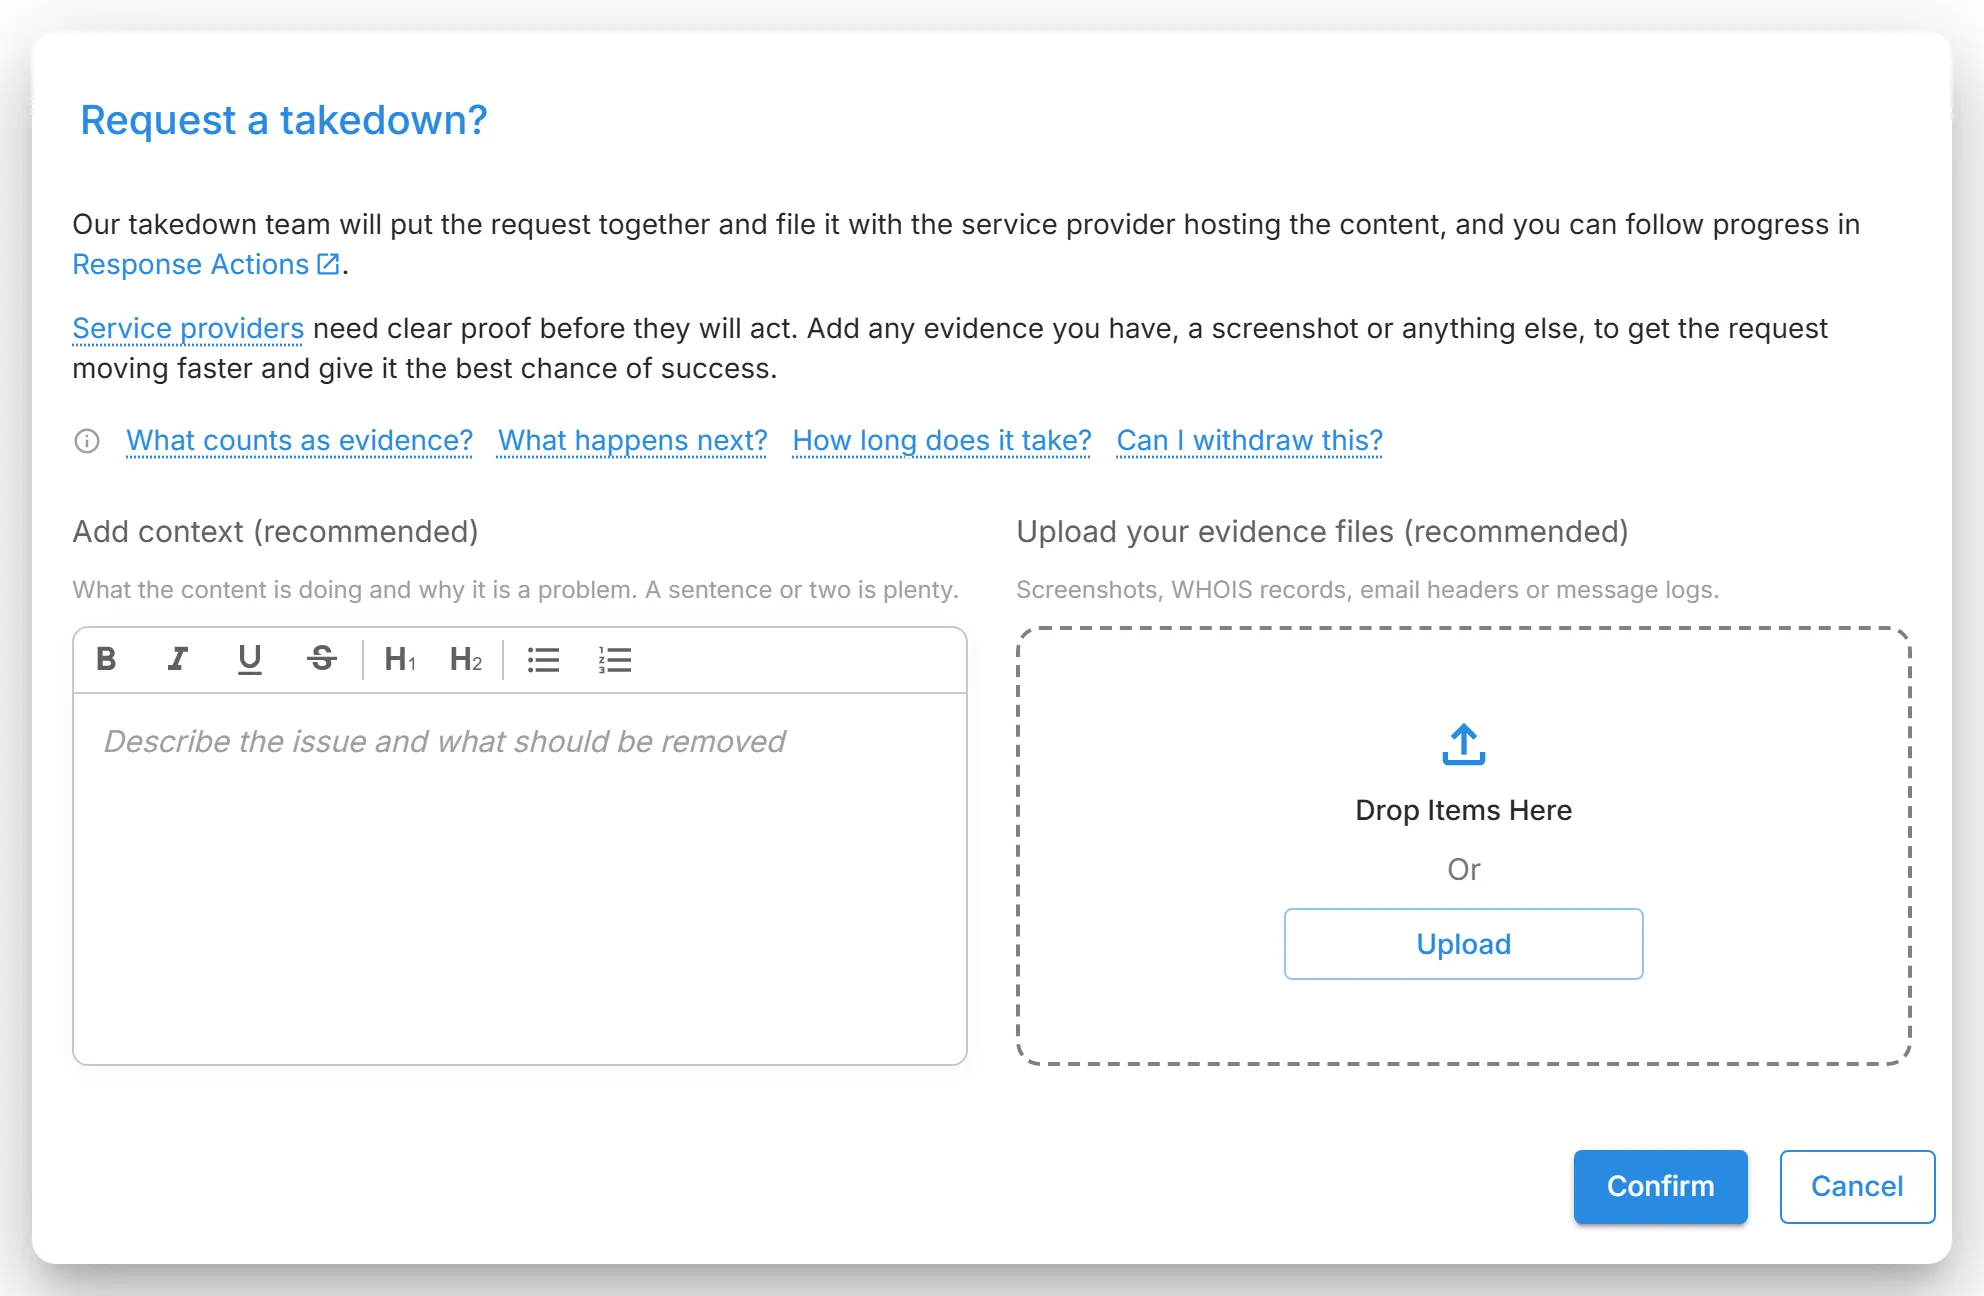
Select "Actions", then "Request Takedown".
-
In "Add context (recommended)", describe what the content is doing and why it is a problem.
-
In "Upload your evidence files (recommended)", add screenshots, WHOIS records, email headers, or message logs.
-
If you attached files, confirm that they can be shared with the relevant service providers.
-
Select "Confirm".
The takedown team prepares the request and files it with the service provider hosting the content, such as the host, registrar, social platform, or app store. The request appears in Response Actions, where you follow its progress. Once a takedown is requested, "Request Takedown" is unavailable for that finding.